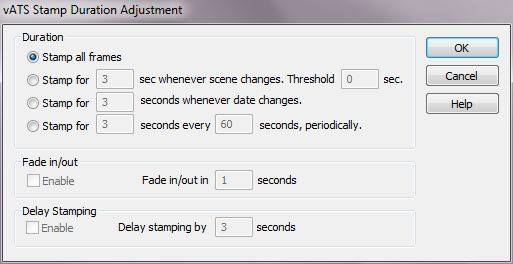
- Select one of the 4 stamp Duration modes:
Mode 1: Stamp all the frames.
Mode 2: Scene detection stamping. When this mode is selected, time stamp will be on for a user-specified amount of time whenever the scene changes. Scene change is defined as the discontinuity in time code of more than the specified threshold in the AVCHD video file being stamped.
Mode 3: Date detection stamping. When this mode is selected, time stamp will be on for a user-specified amount of time whenever the date changes.
Mode 4: Periodic stamping. When this mode is selected, time stamp will be on for a user-specified amount of time (on-time) during a user-specified period. Of course this only makes sense if the on-time is smaller than the period.
For the Duration Modes 2, 3, 4, check Enable Fade box to turn on stamp fade in/out.
-
The fade in/out time applies to both fade in and fade out. For example, if the Duration is in Mode 2 (scene detecting stamping) with the stamp on time being 10 seconds, and the fade in/out time being 3 seconds, then it will take 3 seconds to fade in the stamp to its full brightness, stay that way for 4 seconds, and take another 3 seconds to fade out.
- For the Duration Modes 2, 3, or 4, check Enable Delay Stamping box to turn on delay stamping.
The selected stamp (date or time) will be delayed by a user-specified amount of time. For example, for the scene detection stamping (Mode 2) of 3 seconds, 90 NTSC (or 75 for PAL) frames after the scene changes would be stamped without Delay Stamping. With Delay Stamping of 2 seconds, vATS would skip 60 NTSC (50 PAL) frames and stamp the next 90 NTSC (or 75 for PAL) frames.
Note: Delay Stamping could be used to do alternating date/time stamping (e.g. stamp date for 2 seconds, then stamp time for the next 3 seconds whenever date changes).
- Click OK button to save the changes and exit the dialog.
- Click Cancel button to discard the changes and exit the dialog.
- Click Help button to bring up this Help page.